


Strawberry cheesecake protein balls with 8g protein each. No-bake, ready in 15 minutes, and packed with flavor for a guilt-free snack.
Okay so real talk I stumbled onto these strawberry cheesecake protein balls completely by accident on a Sunday when I was desperately trying to meal prep snacks AND use up a block of cream cheese before it went bad. I threw things together half-hoping for the best, and honestly? I didn't expect that first bite to taste like an actual cheesecake. My husband ate four before I could even roll the last batch. That was six months ago, and I've made them almost every week since.
Oops moment of the century: I once got distracted mid-roll and left the mixture sitting on the counter for 45 minutes. It got SO soft and sticky that the balls just... collapsed into little puddles. I was pressing them back together with my palms, laughing and muttering to myself. Lesson learned always chill the mixture first if your kitchen is warm. Always.
Strawberry Cheesecake Protein Balls: Ingredients You'll Actually Have Fun Shopping For
- 1 cup vanilla protein powder: This is the backbone of the whole recipe and honestly the ingredient that makes these strawberry cheesecake protein balls worth making over a regular energy bite. Vanilla flavor matters here plain or unflavored protein powder makes everything taste weirdly chalky and flat. I've tested this with whey, casein, and plant-based blends. Whey gives the smoothest texture, but a good pea protein works too. Just make sure it's a brand you actually like drinking, because you'll taste it.
- 3/4 cup rolled oats: Old-fashioned rolled oats are your structural hero here. They soak up moisture, add a gentle chew, and keep everything from turning into a sticky blob. I tried quick oats once to be real, the texture was mushier than I wanted. Rolled oats hold their shape just enough to give each bite a little something to chew on. You can pulse them in a blender for a smoother ball if you prefer, but I love the rustic texture as-is.
- 4 oz cream cheese, softened: This is what makes these taste like an actual cheesecake and not just a protein snack dressed up in a cute name. Full-fat cream cheese gives the richest, creamiest result I've tried reduced fat and it works but loses some of that luscious tang. Softening it completely is non-negotiable. Cold cream cheese leaves lumps that no amount of stirring will fix. Leave it on the counter for at least 30 minutes before you start mixing. Trust me on this one.
- 1/2 cup freeze-dried strawberries, crushed: Honestly, freeze-dried strawberries are the secret weapon in this whole recipe. Fresh strawberries add too much moisture and make the mixture impossible to roll. Freeze-dried ones give you this intense, almost candy-like strawberry punch without messing up the texture. I crush them by hand right in the bag super satisfying, weirdly therapeutic. You want a mix of fine powder and small chunks so you get flavor in every single bite of these strawberry cheesecake protein balls.
- 2 tbsp strawberry jam, seedless: A little jam goes a long way here it adds sweetness, moisture, and that glossy strawberry swirl effect that makes these look almost fancy. Seedless is important unless you enjoy unexpected crunchy bits in your cheesecake bites, which, no thank you. I've used homemade jam and store-bought both work great. Just don't go overboard too much and your mixture turns into soup. Two tablespoons is the sweet spot I landed on after a few too-sticky batches.
- 1 tsp fresh lemon zest: Don't skip this. I know it sounds like a minor detail but lemon zest is what makes these taste like cheesecake instead of just a sweet protein ball. That tiny hit of citrus brightens everything up and mimics that classic cream cheese tang you expect from a proper cheesecake. Fresh zest only please the bottled stuff smells like cleaning products and I won't hear otherwise. One lemon gives you way more than a teaspoon so zest the whole thing and save the rest for your water.
How to Make Strawberry Cheesecake Protein Balls Step by Step
- Step 1: Prep Strawberry Swirl:
- This step is where the magic starts and honestly it's my favorite part. Grab your freeze-dried strawberries and crush them right inside the bag squeeze and crunch until you've got a mix of fine pink powder and tiny strawberry flecks. Then stir in your strawberry jam until it looks like a vibrant, jewel-toned swirl. The smell alone is ridiculous sweet, fruity, and completely irresistible. Set this aside for now. You'll fold it into the base later and it's what gives these strawberry cheesecake protein balls their gorgeous color and punchy berry flavor.
- Step 2: Mix Creamy Binders:
- In a large mixing bowl, beat your softened cream cheese and Greek yogurt together until completely smooth and lump-free. This is your cheesecake base and it needs to be silky before anything else goes in. I use a hand mixer for about 60 seconds but a sturdy fork works if you've got patience. Add the honey, almond butter, vanilla extract, and lemon zest right into this mixture. Stir everything together until it smells like a dream tangy, sweet, a little nutty. You'll notice the texture is thick and creamy, which is exactly what you want for rolling later.
- Step 3: Build Cheesecake Base:
- Now you're going to fold your protein powder into that creamy mixture, and this is where these strawberry cheesecake protein balls really start taking shape. Add the protein powder gradually like, don't dump the whole cup in at once unless you enjoy wearing a cloud of powder on your face. I learned that the hard way. Stir gently but thoroughly until no dry streaks remain. The mixture will thicken up noticeably and start looking more like a dough than a batter. It should hold its shape slightly when you press it with a spoon that's your cue to move on.
- Step 4: Combine Dry Ingredients:
- Add your rolled oats right into the cheesecake base and fold them in with a spatula. This is where the texture transforms from sticky and soft to something you can actually work with. The oats absorb some of that cream cheese moisture and give the whole thing body. I like to let the mixture sit for about five minutes after mixing so the oats can hydrate a little it makes rolling so much easier. If the mixture feels too wet, add a tablespoon more oats. Too dry? A tiny splash of Greek yogurt fixes it right up.
- Step 5: Swirl In Strawberries:
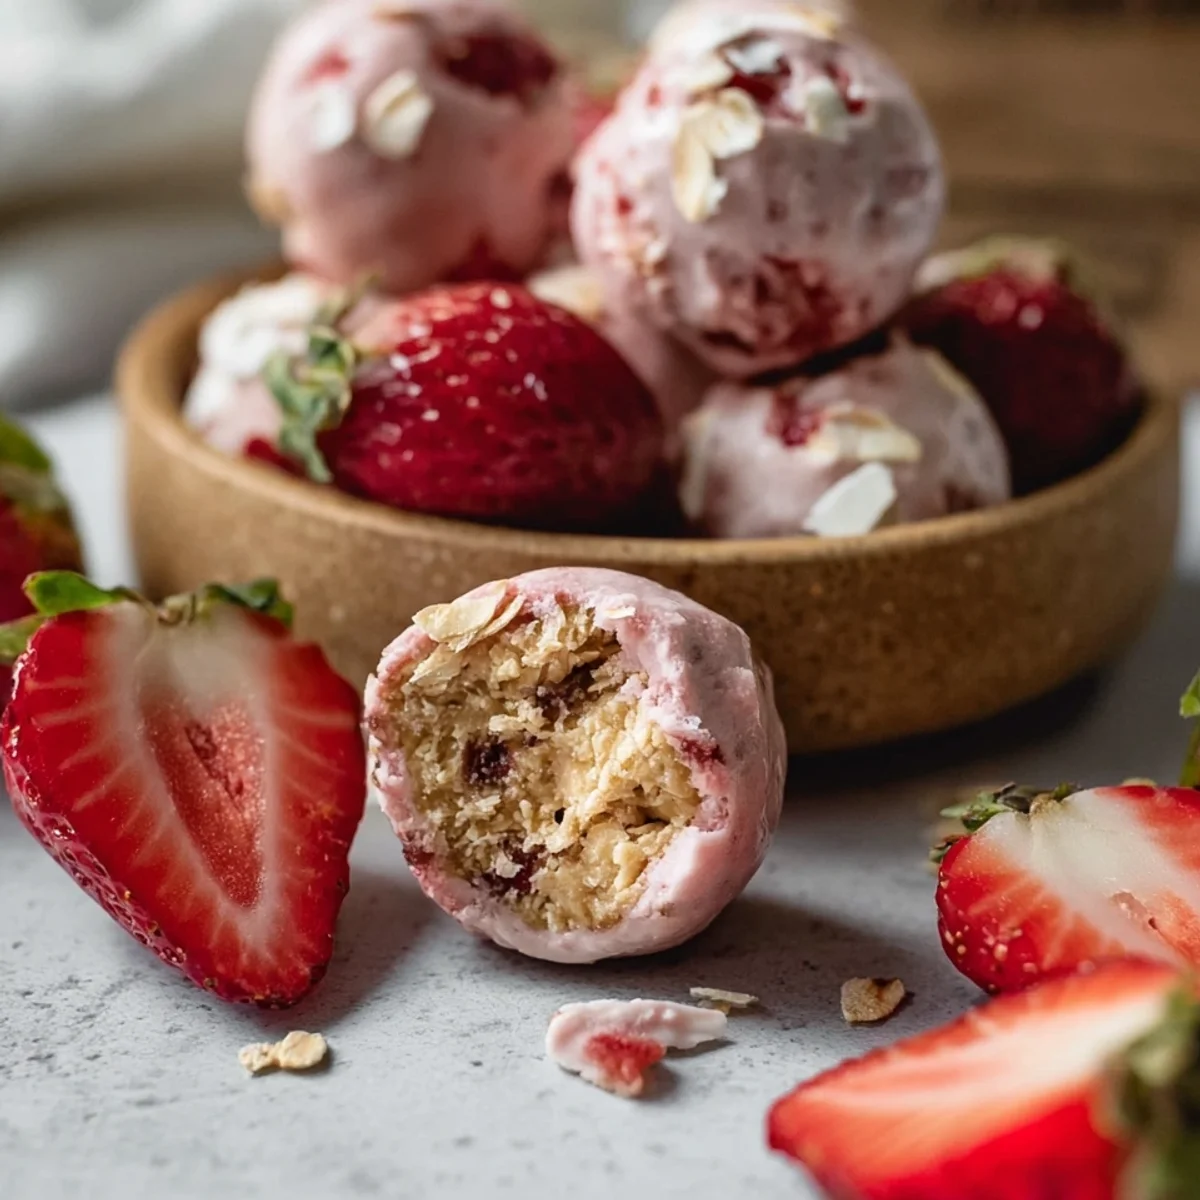
- Here's the fun part take that gorgeous strawberry mixture you prepped in step one and fold it into your base. Don't fully mix it in. You want swirls, pockets of pink, little bursts of strawberry throughout each ball. That's what makes these strawberry cheesecake protein balls look as good as they taste. I do about 8 to 10 gentle folds with a spatula and then stop. Over-mixing makes everything one uniform pink color which is fine but you lose that beautiful marbled cheesecake effect. Embrace the swirl!
- Step 6–8: Coat, Roll, and Chill:
- Crush a few graham crackers into fine crumbs and spread them on a plate this is your coating and it adds that final cheesecake crust vibe that pulls the whole thing together. Scoop about a tablespoon of mixture per ball, roll between your palms quickly, then roll in graham crumbs. Work fast because warm hands soften the mixture. Once all your strawberry cheesecake protein balls are rolled, pop them on a parchment-lined tray and refrigerate for at least 30 minutes. I know waiting is hard but that chill time firms everything up and makes the flavors meld together beautifully. Worth every minute.
Making a batch of these on a Sunday afternoon has become genuinely one of my favorite rituals. The kitchen smells like strawberries and vanilla, there's no oven stress, and I get to eat one warm ball straight off the tray before they even hit the fridge. It feels less like cooking and more like playing and that's honestly the best kind of recipe.
Storage Tips for Keeping Your Strawberry Cheesecake Protein Balls Fresh
Store your strawberry cheesecake protein balls in an airtight container in the refrigerator they'll stay fresh and firm for up to five days. I always layer them between sheets of parchment paper so they don't stick together into one giant protein ball blob, which, yes, has happened to me. For longer storage, these freeze beautifully! Arrange them on a tray to freeze individually first, then transfer to a freezer bag. They keep for up to two months frozen. Thaw in the fridge overnight or on the counter for about 20 minutes before eating. One thing I'd avoid: leaving them at room temperature for more than two hours since the cream cheese can get a little too soft and the texture suffers. Keep them cold and they stay perfect.

Easy Ingredient Swaps for Strawberry Cheesecake Protein Balls
Okay so I've experimented a lot here. If you don't have almond butter, peanut butter works great and adds a fun flavor twist just know it'll taste slightly more peanut-buttery than cheesecake-y. For a dairy-free version, I've swapped the cream cheese for vegan cream cheese and used coconut yogurt instead of Greek yogurt it works! The texture is slightly softer so chill time is extra important. No honey? Maple syrup is a beautiful swap and adds a subtle warmth. If you can't find freeze-dried strawberries, freeze-dried raspberries are incredible and give a slightly more tart flavor profile I honestly loved. For the graham cracker coating, crushed digestive biscuits or even crushed vanilla wafers work perfectly if that's what you've got in the pantry.
Serving Strawberry Cheesecake Protein Balls Like a Total Pro
Honestly these are perfect straight from the fridge as a mid-morning snack or post-workout bite. But if you want to get a little fancy and sometimes you do arrange them on a small platter with fresh strawberry slices and a light drizzle of melted white chocolate. They look stunning on a dessert board next to some dark chocolate and nuts. I've served these strawberry cheesecake protein balls at a baby shower and people genuinely thought I bought them from a bakery. Pair them with a hot cup of coffee or a matcha latte for a snack that feels like a real treat. They're also great crumbled over Greek yogurt or oatmeal if a ball or two gets a little too soft in the fridge.
The Sweet Story Behind Strawberry Cheesecake Protein Balls
Cheesecake has deep roots in American dessert culture creamy, rich, and unapologetically indulgent. New York-style cheesecake has been a diner staple for generations, and the strawberry topping version is basically a classic at this point. What I love about these strawberry cheesecake protein balls is that they take all that nostalgic cheesecake flavor and translate it into something you can actually eat on a Tuesday morning without feeling like you went off the rails. The no-bake energy ball trend has been huge in the health food space for years, and combining it with a beloved American dessert flavor just made total sense to me. It's comfort food meeting modern wellness culture and as someone who grew up eating cheesecake at every family birthday, that combination feels like home.
These little bites have brought so much joy to my weekly routine and I hope they do the same for you. Whether you're snacking between meetings or bringing them to a party, they never disappoint. If you make a batch of these strawberry cheesecake protein balls, please drop a comment below I want to hear all about your swirl game! Tag me in your photos too. You've got this!

Frequently Asked Questions About Strawberry Cheesecake Protein Balls
- → Can I use fresh strawberries instead of freeze-dried?
To be real, I'd skip fresh strawberries here. They add too much moisture and the mixture becomes impossible to roll into firm balls. Freeze-dried strawberries give you way more concentrated flavor without the liquid. If you're in a pinch, pat fresh ones very dry and use less jam to compensate.
- → What protein powder works best in this recipe?
Vanilla whey protein gives the smoothest, creamiest texture in my experience. Plant-based vanilla protein works too but can make the mixture slightly drier just add an extra teaspoon of Greek yogurt if that happens. Avoid unflavored protein powder since the flavor really matters for that cheesecake taste.
- → How long do these need to chill before eating?
At least 30 minutes in the fridge is the minimum that's when they firm up properly and the flavors really come together. Honestly I think they taste even better after a full hour. If you're impatient like me, pop them in the freezer for 15 minutes and you'll get a similar result.
- → Can I make these strawberry cheesecake protein balls ahead of time?
Yes and they're actually better the next day! Make them up to five days ahead and store in an airtight container in the fridge. They're one of my favorite Sunday meal prep projects because the flavor deepens overnight and they're ready to grab all week long.
- → Are these suitable for kids?
My kids are obsessed with them and have zero idea they're eating protein and oats which is a parenting win I'm very proud of. Just check your protein powder ingredients if allergies are a concern. You can also swap almond butter for sunflower seed butter to make them school-safe for nut-free zones.
No-Bake Strawberry Cheesecake Protein Balls
Strawberry cheesecake protein balls with 8g protein each. No-bake, ready in 15 minutes, and packed with flavor for a guilt-free snack.
Ingredients
Cheesecake Protein Base
- 1 cup vanilla protein powder
- 3/4 cup rolled oats
- 4 oz cream cheese, softened
- 1/4 cup Greek yogurt, plain
Strawberry Swirl
- 1/2 cup freeze-dried strawberries, crushed
- 2 tbsp strawberry jam, seedless
- 1 tsp fresh lemon zest
- 1/2 tsp vanilla extract
Creamy Binder
- 3 tbsp honey
- 2 tbsp almond butter
- 2 tbsp coconut oil, melted
- 1 tbsp milk, any variety
Graham Cracker Coating
- 1/2 cup graham cracker crumbs
- 2 tbsp white chocolate chips, finely chopped
- 1 tbsp powdered sugar
- Pinch of salt
Instructions
-
1Prep Strawberry SwirlCrush 1/2 cup freeze-dried strawberries into a fine powder using a zip-lock bag and rolling pin. In a small bowl, combine the crushed strawberries with 2 tbsp seedless strawberry jam, 1 tsp fresh lemon zest, and 1/2 tsp vanilla extract. Stir well and set aside.
-
2Mix Creamy BindersIn a large mixing bowl, whisk together 3 tbsp honey, 2 tbsp almond butter, 2 tbsp melted coconut oil, and 1 tbsp milk until smooth and fully combined. This creamy binder is the secret to perfectly moist No-Bake Strawberry Cheesecake Protein Balls | 8g Protein.
-
3Build Cheesecake BaseAdd 4 oz softened cream cheese and 1/4 cup plain Greek yogurt to the binder mixture. Beat with a hand mixer or sturdy spatula until completely smooth and lump-free. This rich, tangy base is what gives these No-Bake Strawberry Cheesecake Protein Balls | 8g Protein their classic cheesecake flavor.
-
4Combine Dry IngredientsFold in 1 cup vanilla protein powder and 3/4 cup rolled oats into the cream cheese mixture, stirring until a thick, cohesive dough forms. If the mixture feels too sticky, refrigerate for 5 minutes to firm up before proceeding to the next step.
-
5Swirl In StrawberriesGently fold the prepared strawberry swirl mixture into the protein dough using a spatula, creating a marbled effect rather than fully incorporating it. Avoid over-mixing - those beautiful pink streaks are what make every No-Bake Strawberry Cheesecake Protein Balls | 8g Protein visually stunning and flavorful.
-
6Prepare Graham CoatingIn a shallow bowl, combine 1/2 cup graham cracker crumbs, 2 tbsp finely chopped white chocolate chips, 1 tbsp powdered sugar, and a pinch of salt. Mix well to create an even, crumbly coating that perfectly mimics a classic cheesecake crust.
-
7Roll and Coat BallsUsing a tablespoon or small cookie scoop, portion the dough into 12 equal pieces. Roll each portion between your palms into a smooth ball, then immediately roll it in the graham cracker coating mixture, pressing gently so the crumbs adhere evenly on all sides.
-
8Chill Before ServingPlace the coated balls on a parchment-lined baking sheet and refrigerate for at least 30 minutes to firm up. For the best No-Bake Strawberry Cheesecake Protein Balls | 8g Protein, chilling overnight deepens the flavors and gives them a perfectly dense, satisfying texture before serving.
Notes
Storage Tip: Store your protein balls in an airtight container in the refrigerator for up to 7 days, or freeze them in a single layer for up to 2 months. Thaw frozen balls in the fridge overnight before enjoying.
Substitution Tip: Swap almond butter for sunflower seed butter to make these nut-free, or use dairy-free cream cheese and coconut yogurt to create a fully vegan version without sacrificing creaminess or protein content.
Cooking Tip: If your dough is too soft to roll cleanly, chill it in the freezer for 10–15 minutes before portioning. Lightly dampening your palms with cold water also prevents the mixture from sticking while rolling.
Serving Tip: For a party-ready presentation, drizzle finished balls with melted white chocolate and a sprinkle of extra crushed freeze-dried strawberries. Serve straight from the fridge on a chilled platter for the best texture and flavor.
Equipment
Please check ingredients for potential allergens and consult a health professional if in doubt.
Nutrition Facts
It is important to consider this information as approximate and not to use it as definitive health advice.
Comments
Leave a Comment