


Cookie dough protein bars packed with 15g protein per serving. No-bake, ready in 15 minutes, and great for meal prep or post-workout snacking.
Okay, real talk I used to eat actual cookie dough straight from the bowl and call it a snack. No shame. But after one too many sugar crashes mid-afternoon, I started tinkering in my kitchen and landed on these cookie dough protein bars almost by accident. I didn't expect that something this good could also be good for me. Now I make a batch every single Sunday and honestly, they've changed my whole snack game.
Oops so the very first time I made these, I forgot to line the pan. Just... completely forgot. Pressed everything in, chilled it for two hours, and then spent another twenty minutes trying to pry bars out with a butter knife like some kind of archaeological dig. They tasted amazing but looked absolutely tragic. Line your pan, friends. Learn from my chaos.
Cookie Dough Protein Bars: Ingredients You'll Actually Have Fun Buying
- 1 1/2 cups almond flour: Almond flour is honestly the MVP of this whole situation. It gives these cookie dough protein bars that soft, slightly crumbly texture that makes them taste like the real deal. I've tried regular flour and it just doesn't hit the same it gets gummy and weird. Almond flour keeps things light, adds a subtle nuttiness, and it's naturally gluten-free, which is a nice bonus. Make sure you're using blanched almond flour, not almond meal the texture difference is huge.
- 1/2 cup rolled oats: Rolled oats bring that little bit of chew and heartiness that makes these bars feel more substantial. I love how they add a tiny bit of texture contrast against the soft dough. Don't swap these for instant oats they'll disappear into the mix and you'll lose that satisfying bite. Old-fashioned rolled oats are the way to go. They also add some slow-digesting carbs, which means better energy throughout the afternoon.
- 1/4 cup coconut flour: Coconut flour is sneaky powerful a little goes a long way. It absorbs moisture like crazy, which is exactly why we only use a quarter cup. It helps bind the dough together and gives it that slightly dense, cookie-dough-like consistency. I once doubled it by accident and ended up with something closer to sawdust. Not my finest hour. Stick to the quarter cup and you'll get a perfectly cohesive, scoopable dough every time.
- 2 scoops (60g) vanilla whey protein powder: This is what transforms a sweet snack into a genuinely functional one. The vanilla whey protein powder is the backbone of these cookie dough protein bars it adds that classic vanilla flavor while bumping up the protein content significantly. I've tested this with a few different brands and honestly, the quality of your protein powder matters. A good vanilla whey makes the bars taste almost dessert-like. A chalky one will make them taste like a supplement. Spend a little more here.
- 2 tbsp unflavored collagen peptides: I know, I know collagen peptides sound very wellness-influencer-y. But hear me out! They dissolve completely into the dough, you can't taste them at all, and they add an extra protein boost plus some joint and skin benefits. I started adding them after a friend suggested it and I didn't expect that I'd love the results so much. They also slightly improve the texture, making the bars a touch more chewy and satisfying.
- 1/4 cup natural cashew butter: Cashew butter is the secret weapon here. It's milder and creamier than peanut butter or almond butter, so it doesn't overpower the cookie dough flavor. It acts as the binder that holds everything together while adding healthy fats and a subtle richness. Make sure you're using natural cashew butter the kind where the oil separates on top. Stir it well before measuring. The processed, stabilized kind adds unnecessary sugar and makes the dough way too sweet.
How to Make Cookie Dough Protein Bars Step by Step
- Step 1: Prep Your Pan:
- This step seems almost too simple to mention, but trust me it's everything. Grab an 8x8 inch square baking pan and line it generously with parchment paper, letting the edges hang over the sides. Those overhanging edges are your best friends later when you're lifting the whole slab out. I like to press the parchment into the corners nice and flat so the bars have clean edges. Lightly spritz with a little cooking spray if you want extra insurance. Learned that the hard way after the Great Prying Incident of 2022.
- Step 2: Mix Dry Ingredients:
- In a large mixing bowl, whisk together the almond flour, rolled oats, coconut flour, fine sea salt, vanilla whey protein powder, and collagen peptides. This is where the magic starts you'll notice the mixture already smells faintly like cookie dough, which is so exciting. Making cookie dough protein bars begins right here with getting this dry blend perfectly combined. No lumps, no dry pockets of protein powder hiding in the corners. I use a balloon whisk and really go for it for about a full minute.
- Step 3: Combine Wet Ingredients:
- In a separate smaller bowl, stir together the cashew butter, pure maple syrup, unsweetened almond milk, and vanilla extract until smooth and glossy. The smell at this stage is genuinely incredible sweet, nutty, warm vanilla. If your cashew butter is thick and stiff, microwave it for about 15 seconds first so it loosens up and blends more easily. You want this wet mixture to be pourable and smooth before it hits the dry ingredients. Rushing this step and leaving the cashew butter clumpy is a mistake I've made more than once.
- Step 4: Form the Dough:
- Pour the wet mixture into the dry ingredients and stir with a sturdy spatula or wooden spoon. At first it'll look like it's not going to come together don't panic! Keep stirring and folding and within about a minute, you'll have a thick, slightly sticky dough that smells exactly like cookie dough. This is honestly my favorite moment in making cookie dough protein bars. If the dough feels too dry and crumbly, add almond milk one teaspoon at a time. If it's too wet and sticky, a small pinch of extra almond flour fixes it right up.
- Step 5: Press and Chill:
- Transfer the dough to your prepared pan and press it down firmly and evenly using the back of a spatula or the bottom of a flat measuring cup. You want it compact and smooth on top no air pockets, no uneven spots. This pressing step is what gives cookie dough protein bars their satisfying dense texture rather than a crumbly mess. Once it's pressed flat, cover the pan with plastic wrap and pop it in the fridge for at least one hour, though two hours is better. The waiting is genuinely the hardest part.
- Step 6–8: Chocolate Coating, Garnish, and Serve:
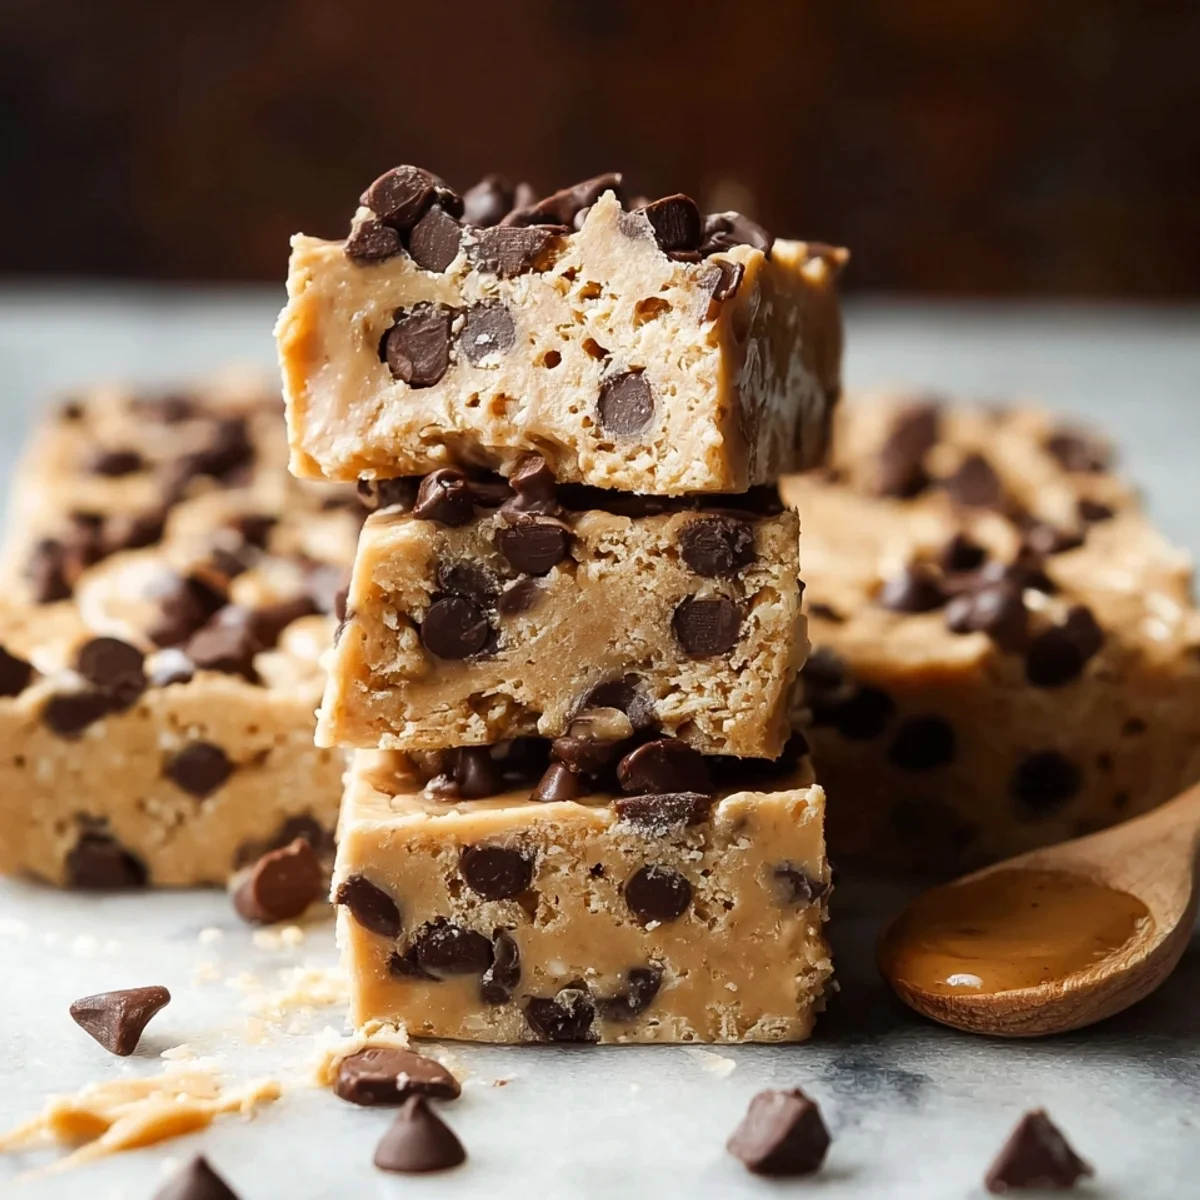
- Lift the chilled slab out using those parchment paper handles and slice it into 10 even bars. Melt your chocolate chips in a microwave-safe bowl in 30-second bursts, stirring between each, until silky smooth. Dip or drizzle each bar generously, then sprinkle with flaky sea salt or mini chocolate chips before the coating sets. Place them on a parchment-lined tray and refrigerate for another 15 minutes until firm. I didn't expect that the chocolate coating would make these cookie dough protein bars feel so genuinely indulgent but here we are.
Honestly, making these has become one of my favorite Sunday rituals. There's something so satisfying about pressing that dough into the pan, knowing that future-me is going to be really grateful come Wednesday afternoon. The kitchen smells like vanilla and chocolate, there's no oven involved, and the whole process takes maybe 20 minutes of actual hands-on time. It feels less like cooking and more like a little act of self-care.
Storage Tips for Your Cookie Dough Protein Bars
These bars store beautifully, which is one of the reasons I make them every week. In the fridge, they'll keep for up to 10 days in an airtight container layer them between sheets of parchment paper so the chocolate coating doesn't stick together and make a mess. I learned that one after opening a container to find all 10 bars fused into one giant chocolate slab. Still delicious, but not exactly portable. For longer storage, they freeze wonderfully for up to 3 months. Just wrap each bar individually in plastic wrap, then store in a zip-lock freezer bag. Thaw overnight in the fridge or at room temperature for about 30 minutes. Don't leave them at room temperature for more than a couple of hours though the chocolate gets soft and things get sticky fast.

Ingredient Swaps I've Tried for Cookie Dough Protein Bars
I've played around with this recipe a lot, so here's what I know works. Swap cashew butter for almond butter or sunflower seed butter if needed almond butter gives a slightly stronger flavor but works great, and sunflower seed butter makes it nut-free. For a vegan version, use a plant-based vanilla protein powder instead of whey and skip the collagen peptides or replace them with extra protein powder. Maple syrup can be swapped for honey or agave honey makes them a touch richer. If you're out of almond milk, any plant-based milk or even regular milk works fine here. Oat flour can replace the rolled oats if you want a smoother texture, though you'll lose a little of that satisfying chew. Honestly, this recipe is pretty forgiving once you understand the basic ratios.
Serving Cookie Dough Protein Bars Like You Mean It
To be real, these are perfect straight from the fridge as an afternoon snack with a big glass of cold almond milk that's my personal favorite. But they're also great pre-workout with a banana for some extra carbs, or post-workout when you need protein fast and don't feel like cooking. I've packed them in lunchboxes, brought them to office meetings, and served them on a little dessert platter at a casual get-together where everyone assumed they were regular indulgent treats. Nobody guessed they were high-protein until I told them! They also pair surprisingly well with a hot cup of coffee something about the chocolate and vanilla against a bold roast is just chef's kiss. Slice them smaller for a little two-bite treat situation if you're serving a crowd.
The Sweet Story Behind Cookie Dough Protein Bars
Cookie dough as a flavor and concept has been a beloved American obsession since at least the late 1980s, when Nestlé Toll House made it a household staple and Ben & Jerry's launched their iconic cookie dough ice cream in 1991. The idea of eating raw dough sneaking spoonfuls before the cookies hit the oven is practically a childhood rite of passage in American homes. The high-protein, no-bake bar world took that nostalgia and ran with it, creating a whole genre of snacks that let you eat something that feels naughty but is actually nutritious. I got obsessed with recreating that feeling at home after spending way too much money on store-bought protein bars that tasted nothing like cookie dough. My version is my love letter to that childhood memory, made a little smarter.
These cookie dough protein bars have honestly become one of the recipes I'm most proud of they're the kind of thing that makes people's eyes go wide when you tell them what's in them. I'd love to know how yours turn out! Drop a comment below, tag me in your photos, or just come back and tell me if you made any fun tweaks. Happy snacking, friends!

Frequently Asked Questions about Cookie Dough Protein Bars
- → Can I use a different protein powder in these cookie dough protein bars?
You can! Plant-based vanilla protein powder works well for a dairy-free version. Just know that different protein powders absorb liquid differently, so you might need to adjust the almond milk by a teaspoon or two to get the right dough consistency. Taste as you go!
- → Do these cookie dough protein bars need to be refrigerated?
Yes, they do especially once they're coated in chocolate. The fridge keeps them firm, fresh, and perfectly textured. They'll get soft and sticky at room temperature after a couple of hours. I keep mine in a sealed container in the fridge and they stay perfect for up to 10 days.
- → How much protein is in each bar?
It varies slightly depending on your specific protein powder and collagen brand, but each bar comes out to roughly 12–15 grams of protein. That's a solid snack-level protein hit! If you want more, you can add an extra half scoop of protein powder just add a touch more almond milk to compensate.
- → Can I make these nut-free?
Totally! Swap the almond flour for oat flour, replace the cashew butter with sunflower seed butter, and use oat milk instead of almond milk. The flavor will be slightly different but still really delicious. Oat flour makes the texture a tiny bit softer, which is honestly not a bad thing at all.
- → Why is my dough too crumbly and not coming together?
This usually means the dough needs a little more moisture add almond milk one teaspoon at a time and stir well between additions. Also double-check that your cashew butter was properly stirred and at room temperature. Cold, stiff nut butter doesn't incorporate as smoothly and can cause a dry, crumbly mix.
Cookie Dough Protein Bars: No-Bake Snack
Cookie dough protein bars packed with 15g protein per serving. No-bake, ready in 15 minutes, and great for meal prep or post-workout snacking.
Ingredients
Chewy Cookie Dough Base
- 1 1/2 cups almond flour
- 1/2 cup rolled oats
- 1/4 cup coconut flour
- 1/4 tsp fine sea salt
Protein Power Blend
- 2 scoops (60g) vanilla whey protein powder
- 2 tbsp unflavored collagen peptides
- 1/4 cup natural cashew butter
- 3 tbsp pure maple syrup
- 3 tbsp unsweetened almond milk
- 1 tsp pure vanilla extract
Sweet Mix-Ins
- 1/2 cup mini dark chocolate chips (70% cacao)
- 2 tbsp raw honey
- 1/4 cup medjool dates, pitted and finely chopped
Chocolate Shell Coating
- 3/4 cup dark chocolate chips (70% cacao)
- 1 tbsp coconut oil
- 1/4 tsp flaky sea salt, for topping
- 1 tbsp crushed roasted almonds, for garnish
Instructions
-
1Prep Your PanLine an 8x8-inch baking pan with parchment paper, leaving overhang on two sides for easy lifting. Lightly grease the paper with coconut oil. This setup ensures your Cookie Dough Protein Bars: Healthy No-Bake Snack release cleanly and hold their shape perfectly.
-
2Mix Dry IngredientsIn a large mixing bowl, whisk together 1 1/2 cups almond flour, 1/2 cup rolled oats, 1/4 cup coconut flour, 1/4 tsp fine sea salt, 2 scoops vanilla whey protein powder, and 2 tbsp collagen peptides until evenly combined with no visible clumps.
-
3Combine Wet IngredientsIn a separate small bowl, stir together 1/4 cup cashew butter, 3 tbsp maple syrup, 3 tbsp almond milk, 1 tsp vanilla extract, and 2 tbsp raw honey until smooth and fully blended. The mixture should be pourable but thick and glossy.
-
4Form the DoughPour the wet mixture into the dry ingredients and mix with a spatula or clean hands until a thick, cohesive dough forms. Fold in 1/4 cup finely chopped Medjool dates and 1/2 cup mini dark chocolate chips. For the best Cookie Dough Protein Bars: Healthy No-Bake Snack, make sure the mix-ins are evenly distributed throughout the dough.
-
5Press and ChillTransfer the dough into the prepared pan and press it down firmly and evenly using the back of a spoon or flat-bottomed glass to about 3/4-inch thickness. Refrigerate for at least 30 minutes until the base is firm enough to slice cleanly into 10 bars.
-
6Melt Chocolate CoatingIn a microwave-safe bowl, combine 3/4 cup dark chocolate chips and 1 tbsp coconut oil. Microwave in 30-second intervals, stirring between each, until fully melted and silky smooth. This rich chocolate shell is what elevates these Cookie Dough Protein Bars: Healthy No-Bake Snack to the next level.
-
7Coat and GarnishRemove the chilled slab from the pan and slice into 10 equal bars. Dip or drizzle each bar generously with the melted chocolate coating, then immediately sprinkle with 1/4 tsp flaky sea salt and 1 tbsp crushed roasted almonds before the chocolate sets.
-
8Set and ServePlace the coated bars on a parchment-lined tray and refrigerate for 15–20 minutes until the chocolate shell is fully set and firm. Your Cookie Dough Protein Bars: Healthy No-Bake Snack are ready to enjoy straight from the fridge or at room temperature for a softer bite.
Notes
Storage Tip: Store your bars in an airtight container in the refrigerator for up to 10 days, or freeze individually wrapped bars for up to 2 months. Let frozen bars thaw at room temperature for 10 minutes before eating.
Substitution Tip: Cashew butter can be swapped for almond butter or sunflower seed butter for a nut-free version. If you don't have collagen peptides, simply increase the protein powder to 2 1/2 scoops or omit and add 2 extra tbsp of almond flour.
Protein Powder Note: The texture of these bars can vary depending on your protein powder brand. If the dough feels too dry or crumbly, add almond milk one teaspoon at a time until it comes together. If too sticky, add a tablespoon of almond flour.
Serving Tip: For a dessert-worthy presentation, serve these bars slightly chilled on a wooden board alongside fresh berries. They also make an excellent pre- or post-workout snack packed with protein, healthy fats, and natural energy from dates and maple syrup.
Equipment
Please check ingredients for potential allergens and consult a health professional if in doubt.
Nutrition Facts
It is important to consider this information as approximate and not to use it as definitive health advice.
Comments
Leave a Comment