


Salmon sushi bake layers seasoned rice, creamy spicy salmon, and savory toppings into an easy, crowd-pleasing casserole ready in 40 minutes.
Okay, so I first stumbled onto this salmon sushi bake at a potluck two years ago and I literally could not stop eating it. My friend Mara brought this bubbling, golden dish to the table and I was skeptical baked sushi? That sounds wrong. But one scoop onto a sheet of nori and I was completely gone. I went home that same night, texted her for the recipe, and honestly haven't stopped making it since.
Oops okay, real talk. The first time I made this solo, I forgot to season the rice. Like, completely forgot. I layered the whole dish, baked it, served it, and kept wondering why it tasted flat. My husband was being so polite about it too, bless him. I didn't expect that one missing step to matter so much, but the seasoned rice is genuinely everything. Don't be me. Season your rice!
Salmon Sushi Bake: Ingredients You'll Need Tonight
- 2 cups sushi rice (short-grain): Short-grain sushi rice is non-negotiable here and I learned that the hard way when I once subbed in long-grain rice thinking it wouldn't matter. It matters! Short-grain rice has that sticky, slightly chewy texture that holds everything together in the salmon sushi bake. It creates the perfect base layer that scoops beautifully onto nori without falling apart. Please, just grab the right rice. Your future self will thank you.
- 3 tbsp rice vinegar, 1 tbsp sugar, 1 tsp salt: This trio is what transforms plain cooked rice into actual sushi rice and honestly, it's pure magic. The vinegar gives that subtle tang, the sugar adds a tiny sweetness, and the salt ties it all together. I used to eyeball this and the rice always tasted off. Now I measure every single time. Don't skip the seasoning step thinking it's minor, because it is the whole soul of the base layer.
- 1 lb fresh salmon fillet (skin removed): Fresh salmon is the star of this whole show, and I always try to grab the best quality I can find. I've used both Atlantic and sockeye both work great, though sockeye gives a richer, deeper flavor. To be real, I've also made this with canned salmon in a pinch and it's still good, just not quite the same. Fresh salmon flakes into these gorgeous, buttery chunks that make every single bite feel luxurious.
- 8 oz cream cheese (softened): Softened cream cheese is what makes the filling so lusciously creamy and thick and please, please let it soften properly at room temperature before you start. I've tried microwaving cold cream cheese to rush it and ended up with weird lumpy pockets in my filling. Not cute. When it's properly soft, it blends seamlessly with the mayo and salmon into this dreamy, spreadable mixture that is honestly the heart of this salmon sushi bake.
- 1/2 cup Japanese mayonnaise (Kewpie): Kewpie mayo is not the same as regular mayo I cannot stress this enough. It's richer, tangier, and has this subtle umami depth that regular mayo just can't replicate. I once ran out and used American mayo and the whole topping tasted weirdly sweet and flat. Kewpie is made with egg yolks only and rice vinegar, which gives it that signature silkiness. Find it at any Asian grocery store or online it's worth every penny.
- 2 tbsp sriracha sauce, 1 tbsp soy sauce: These two little additions are the flavor punch that makes everything click. The sriracha brings heat and a garlicky warmth, while the soy sauce adds that deep, savory umami backbone. I've adjusted this ratio probably fifty times over the years. Two tablespoons of sriracha is my sweet spot for medium heat go up to three if your crowd loves spice, or drop to one for something milder. The soy sauce is small but mighty, don't skip it.
How to Make a Salmon Sushi Bake Step by Step
- Step 1 & 2: Cook and Season the Sushi Rice:
- Start by rinsing your two cups of short-grain rice until the water runs pretty clear this removes excess starch and keeps your rice from getting gummy. Cook it with 2.5 cups of water, then while it's still hot, fold in your rice vinegar, sugar, and salt mixture. I use a wooden spoon and gentle folding motions so I don't mash the grains. The rice should look glossy and smell slightly tangy. This seasoned base is genuinely the foundation of a great salmon sushi bake, so give it the love it deserves.
- Step 3: Preheat and Prep the Salmon:
- Preheat your oven to 400°F while you prep the salmon. I like to pat the fillet dry with paper towels first less moisture means better texture in the final dish. You can either bake the salmon separately for about 12 minutes until it flakes easily, or use a fork to break it into chunks raw and let it cook in the assembled dish. Honestly, I've done both! Pre-baking gives you more control over the texture. Either way, you want those beautiful flaky pieces ready to mix into your creamy filling.
- Step 4: Make the Creamy Salmon Filling:
- This is my favorite step because the kitchen starts smelling absolutely incredible. In a large bowl, mix your softened cream cheese, Kewpie mayo, sriracha, and soy sauce until smooth and creamy. Then fold in your flaked salmon gently you want chunks, not mush. I didn't expect that the ratio of cream cheese to mayo would matter so much, but it really creates that perfect balance of rich and tangy. This creamy mixture is what makes the salmon sushi bake so irresistible and different from anything else.
- Step 5: Layer the Baking Dish:
- Grab a 9x13 baking dish and spread your seasoned sushi rice in an even layer across the bottom press it down gently so it's compact and holds together when you scoop it later. Then spoon that gorgeous creamy salmon filling over the top and spread it evenly all the way to the edges. To be real, I always sneak a little taste of the filling at this stage. Every. Single. Time. The layering is simple but it's what gives the salmon sushi bake that beautiful contrast of textures firm rice on the bottom, creamy topping above.
- Step 6 & 7: Bake and Garnish:
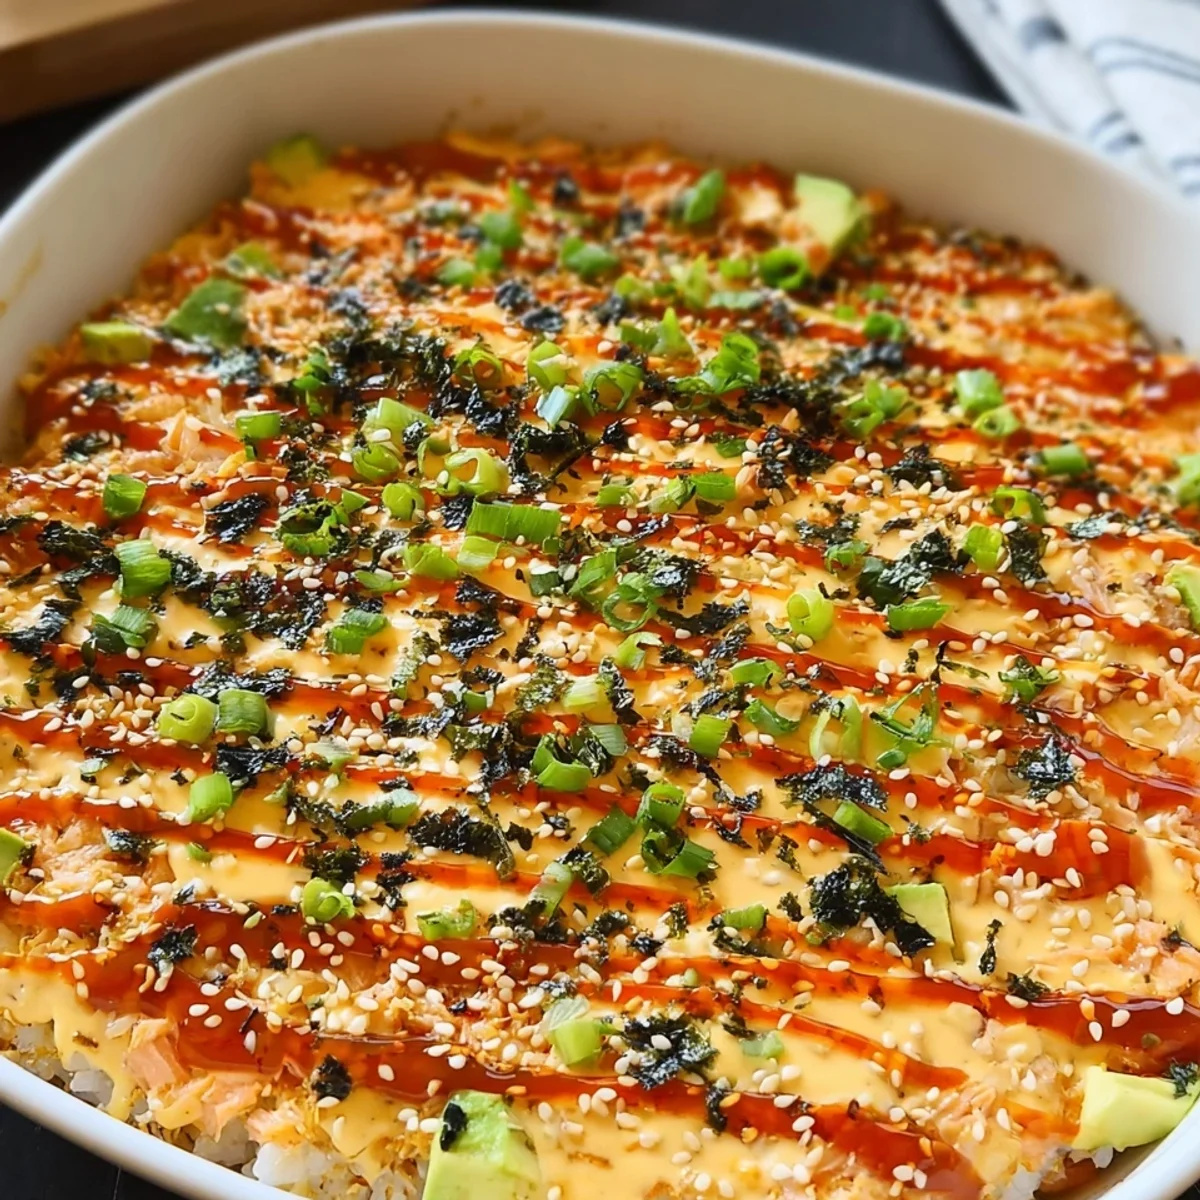
- Slide your dish into the 400°F oven and bake for about 20 minutes until the top is bubbling and starting to turn golden at the edges. I sometimes hit it with the broiler for the last two minutes to get those gorgeous caramelized spots on top just watch it closely because it can go from golden to burnt fast! Once it's out of the oven, this is when the salmon sushi bake really comes to life visually. Garnish with thinly sliced green onions, sesame seeds, and a drizzle of extra sriracha or Kewpie mayo for that restaurant-worthy finish.
- Step 8: Serve with Nori:
- Cut your roasted nori sheets into quarters or smaller pieces and arrange them around the baking dish this is how everyone scoops and eats! Each person takes a little sheet of nori, scoops a spoonful of the warm salmon sushi bake onto it, and folds it up like a little hand roll. The contrast of the crispy nori against the warm, creamy filling is just chef's kiss. I always put out extra nori because people go through it faster than you'd think. This serving style makes it feel interactive and fun at the table.
Every time I make this, the kitchen fills up with people. I'm not even joking my kids wander in, my husband suddenly needs to 'check on something' near the oven, and whoever's visiting starts hovering by the counter. There's something about the smell of that creamy topping bubbling away that just pulls people in. It's become one of those recipes that feels like a little celebration even on a random Tuesday night.
Storage Tips for Your Salmon Sushi Bake Leftovers
Store any leftover salmon sushi bake in an airtight container in the fridge for up to two days and honestly, it reheats beautifully. I just microwave individual portions for about 90 seconds, covered with a damp paper towel to keep the rice from drying out. The first time I stored it uncovered in the fridge, the rice turned into little pebbles overnight. Lesson learned! I wouldn't freeze this one the cream cheese filling gets grainy and weird after freezing and thawing, and the rice texture suffers too. If you're prepping ahead, you can make the seasoned rice and the creamy filling separately and store them in the fridge overnight, then layer and bake the next day. That actually works really well for dinner parties!

Easy Ingredient Swaps for Salmon Sushi Bake
I've experimented with this recipe a lot, so here's what I know works! If you can't find fresh salmon, canned salmon (well-drained) or even imitation crab meat works surprisingly well the flavor is different but still delicious. Out of Kewpie mayo? Regular full-fat mayo with a tiny splash of rice vinegar gets you close. For a lighter version, I've swapped half the cream cheese for Greek yogurt and it's still creamy and good, just a little tangier. Cauliflower rice works as a low-carb base, though the texture is softer and less cohesive. Swap sriracha for gochujang if you want a deeper, slightly smoky heat I actually love that version. And if nori isn't your thing, butter lettuce cups work great for scooping too!
Serving Your Salmon Sushi Bake Like a Pro
Honestly, this dish is a full meal on its own, but I love rounding it out with a few simple sides. A quick cucumber salad with rice vinegar and sesame oil is my go-to it cuts through the richness perfectly. Edamame sprinkled with flaky sea salt is always a crowd-pleaser alongside it. For drinks, a cold Sapporo beer or a crisp sparkling water with yuzu is so refreshing next to all that creamy richness. If I'm serving this for a casual dinner party, I'll set out little bowls of pickled ginger and extra sriracha so everyone can customize their bites. The nori sheets make it feel interactive and fun almost like a little DIY hand roll station right at the table!
The Cultural Backstory Behind Salmon Sushi Bake
The salmon sushi bake is a beautiful example of fusion food done right it's widely credited to Filipino-American communities, particularly in Hawaii and California, who took the beloved flavors of Japanese sushi and adapted them into a warm, shareable casserole format. It blew up on social media a few years back and for good reason. To be real, it's the kind of dish that honors the spirit of Japanese cuisine fresh fish, seasoned rice, nori while making it accessible and communal in a whole new way. I love that about food. It travels, it evolves, it picks up new influences. Every time I serve this at my table, it sparks a conversation about where food comes from and how it connects us across cultures.
If you make this salmon sushi bake, I genuinely want to hear about it drop a comment below and tell me how it went! Did your family hover around the oven like mine does? Did you sneak a taste of the filling before it even hit the dish? No judgment here. This recipe has brought so much joy to my table and I hope it does the same for yours. Happy cooking, friend!

Frequently Asked Questions about Salmon Sushi Bake
- → Can I make salmon sushi bake ahead of time?
Yes! You can prep the seasoned rice and creamy filling separately up to a day ahead and store them in the fridge. Just layer and bake when you're ready. I do this all the time for dinner parties and it saves so much last-minute stress. Just add about five extra minutes to the bake time since everything starts cold.
- → What temperature should I bake this at?
I bake mine at 400°F for about 20 minutes, then sometimes hit the broiler for two minutes at the end for that golden, bubbly top. Just watch it closely under the broiler it can go from perfect to burnt surprisingly fast and I've made that mistake more than once!
- → Can I use frozen salmon instead of fresh?
Totally! Just thaw it completely and pat it very dry before using excess moisture is the enemy here and will make your filling watery. I've used frozen salmon plenty of times when fresh wasn't available and the results are still really good. Just make sure it's fully thawed and dried well.
- → How spicy is this recipe?
With two tablespoons of sriracha, it's a medium heat noticeable but not overwhelming. For a milder version, drop it to one tablespoon or even just a teaspoon. Want more fire? Go up to three tablespoons or add a drizzle of chili oil on top. It's super easy to adjust to your crowd's spice tolerance.
- → Where do I find Kewpie mayo and nori sheets?
Any Asian grocery store will have both that's always my first stop. But honestly, most larger supermarkets carry them in the international foods aisle now. You can also order both easily online. Kewpie usually comes in a soft squeeze bottle with a red cap you'll recognize it immediately once you spot it!
Creamy Salmon Sushi Bake
Salmon sushi bake layers seasoned rice, creamy spicy salmon, and savory toppings into an easy, crowd-pleasing casserole ready in 40 minutes.
Ingredients
Seasoned Sushi Rice Base
- 2 cups sushi rice (short-grain)
- 2 1/2 cups water
- 3 tbsp rice vinegar
- 1 tbsp granulated sugar
- 1 tsp salt
Creamy Salmon Filling
- 1 lb fresh salmon fillet (skin removed)
- 8 oz cream cheese (softened)
- 1/2 cup Japanese mayonnaise (Kewpie)
- 2 tbsp sriracha sauce
- 1 tbsp soy sauce
Umami Flavor Boosters
- 2 tbsp furikake seasoning
- 1 tbsp sesame oil
- 3 green onions (thinly sliced)
- 1 tsp garlic powder
Crispy Finish & Garnish
- 4 sheets roasted nori (cut into squares, for serving)
- 1 tbsp toasted sesame seeds
- 1/4 cup masago or tobiko (fish roe, for garnish)
Instructions
-
1Cook the Sushi RiceRinse 2 cups of sushi rice under cold water until the water runs clear. Combine with 2 1/2 cups water in a rice cooker or saucepan and cook according to package directions. Perfectly cooked rice is the foundation of your Creamy Salmon Sushi Bake: Easy Asian-Inspired Dinner.
-
2Season the RiceWhile the rice is still hot, whisk together 3 tbsp rice vinegar, 1 tbsp granulated sugar, and 1 tsp salt until dissolved. Gently fold the seasoning mixture into the cooked rice using a wooden spoon or rice paddle, then let it cool to room temperature.
-
3Preheat and Prep SalmonPreheat your oven to 400°F. Cut 1 lb of fresh salmon fillet into small 1-inch chunks. Season lightly with 1 tbsp sesame oil and 1 tsp garlic powder. Arrange the salmon pieces on a foil-lined baking sheet and bake for 10 minutes until just cooked through.
-
4Make Creamy Salmon FillingFlake the baked salmon into a large mixing bowl. Add 8 oz softened cream cheese, 1/2 cup Japanese mayonnaise (Kewpie), 2 tbsp sriracha sauce, and 1 tbsp soy sauce. Mix everything together until creamy and well combined. This rich filling is what makes this Creamy Salmon Sushi Bake: Easy Asian-Inspired Dinner so irresistible.
-
5Layer the Baking DishLightly grease a 9x13-inch baking dish. Spread the seasoned sushi rice evenly across the bottom, pressing it into a firm, even layer. Sprinkle 1 tbsp of furikake seasoning over the rice, then spread the creamy salmon filling evenly on top using a spatula.
-
6Top and BakeSprinkle the remaining 1 tbsp of furikake seasoning over the salmon layer. Bake your Creamy Salmon Sushi Bake: Easy Asian-Inspired Dinner at 400°F for 15 minutes, until the top is bubbly and lightly golden. For extra color, broil on high for an additional 2 minutes at the end.
-
7Garnish Before ServingRemove the dish from the oven and immediately garnish with 1/4 cup masago or tobiko, 1 tbsp toasted sesame seeds, and 3 thinly sliced green onions. These fresh toppings add color, texture, and a burst of umami flavor to every bite.
-
8Serve with NoriFor the best Creamy Salmon Sushi Bake: Easy Asian-Inspired Dinner experience, let it rest for 3-5 minutes before serving. Scoop generous portions onto 4 sheets of roasted nori cut into squares, fold them like a taco, and enjoy immediately while the nori is still crispy.
Notes
🐟 Ingredient Tip: If fresh salmon isn't available, canned salmon or imitation crab (surimi) works beautifully as a budget-friendly substitute without sacrificing flavor.
🧊 Storage Advice: Store leftovers in an airtight container in the refrigerator for up to 2 days. Reheat in the oven at 350°F for 10 minutes to restore the creamy texture. Avoid microwaving, as it can make the rice gummy.
🌶️ Spice Adjustment: Control the heat level by adjusting the sriracha sauce. Use 1 tbsp for a mild version or increase to 3 tbsp for a spicier kick. You can also drizzle extra sriracha on top before serving.
🍽️ Serving Suggestion: Set up a fun DIY serving station with the nori squares on the side so guests can scoop and wrap their own portions. Pair with a simple cucumber salad or miso soup to complete the Asian-inspired meal.
Equipment
Please check ingredients for potential allergens and consult a health professional if in doubt.
Nutrition Facts
It is important to consider this information as approximate and not to use it as definitive health advice.
Comments
Leave a Comment