


Protein powder waffles packed with 41g protein per serving. Crispy outside, fluffy inside a high-protein breakfast ready in 20 minutes.
Okay, so I stumbled onto protein powder waffles completely by accident. I was out of regular flour one Sunday morning, desperate for waffles, and just started throwing things together. My protein powder was sitting right there on the counter, and honestly, I figured worst case, I'd eat cereal. But these came out so crispy and golden that I literally made them three more times that same week. No regrets.
Oops okay, I have to tell you about the time I skipped the resting step because I was impatient and hungry. I poured the batter straight in and ended up with waffles that stuck so badly to the iron I basically had to chisel them out. The smoke alarm went off. My dog left the room. Rest the batter, friends. I cannot stress this enough.
Protein Powder Waffles: Ingredients You Actually Need
- 1 cup vanilla whey protein powder (about 4 scoops): This is the whole heart of these protein powder waffles, so don't skimp on quality here. I use vanilla whey because it adds natural sweetness without extra sugar, and the flavor just works beautifully with the vanilla extract. Honestly, I've tried unflavored protein powder before and it's fine, but vanilla whey takes these from 'healthy breakfast' to 'wait, this actually tastes amazing.' Go with a brand you already like drinking it really does make a difference.
- 1/2 cup whole wheat flour: I know, I know why add flour at all? To be real, I tried making these completely flourless once and ended up with a rubbery, dense situation that was not cute. The whole wheat flour gives the batter structure and helps create those crispy edges we're after. It also adds a tiny nutty flavor that pairs so well with the vanilla. Don't swap it for all-purpose right away give whole wheat a chance first.
- 3/4 cup plain Greek yogurt (2% fat): Greek yogurt is my secret weapon in this recipe and honestly in life. It keeps the waffles moist and fluffy on the inside while adding a subtle tang that balances the sweetness of the protein powder. I've used full-fat and nonfat versions full-fat makes them a little richer, nonfat makes them slightly drier. The 2% fat version is the sweet spot I keep coming back to every single time.
- 2 large eggs: Eggs are doing serious heavy lifting here binding everything together and helping with that lift and fluff we want in every bite. I once tried making a flax egg version for a friend, and while it technically worked, the texture was noticeably denser. For the best results, use room temperature eggs if you can remember to pull them out ahead of time. I almost never remember, and they still turn out great, so don't stress too hard.
- 1/2 cup unsweetened almond milk: Almond milk keeps this recipe lighter without sacrificing moisture, and the unsweetened version means you're controlling all the sweetness yourself. I've also used oat milk when I was out of almond milk, and honestly? Barely noticed a difference. The milk is really just there to loosen the batter to the right consistency you want it pourable but not watery. If it looks too thick after mixing, add a splash more.
- 2 tbsp melted coconut oil: Don't skip the fat I learned this the hard way when I tried making these 'lighter' by leaving out the coconut oil entirely. The waffles stuck, they were dry, and I was sad. The melted coconut oil adds just enough richness to get those gorgeous crispy edges and prevents sticking. It also adds a very subtle coconut flavor that I personally love. If coconut isn't your thing, melted butter works perfectly and tastes incredible too.
How to Make Protein Powder Waffles Step by Step
- Step 1: Preheat Your Waffle Iron:
- Before you do anything else, get that waffle iron heating up. This is non-negotiable! A properly preheated iron is the difference between crispy protein powder waffles and a sad, pale, stuck mess. I always let mine heat for at least five full minutes most irons have an indicator light, but I honestly don't trust it and wait an extra minute anyway. While it's heating, give the plates a light spray of cooking spray or brush with a little melted coconut oil. You'll thank yourself later.
- Step 2: Mix Dry Ingredients:
- Grab your biggest mixing bowl and whisk together the protein powder, whole wheat flour, baking powder, baking soda, and sea salt. This step feels simple, but whisking actually matters here protein powder loves to clump, and those clumps will haunt your finished protein powder waffles if you don't break them up now. I've found that sifting the protein powder first makes this even easier. Spend an extra thirty seconds here and your batter will be so much smoother. It's worth it!
- Step 3: Combine Wet Ingredients:
- In a separate bowl or large measuring cup, whisk together the Greek yogurt, eggs, almond milk, melted coconut oil, and vanilla extract. Make sure your coconut oil is fully melted but not scorching hot if it's too hot it'll start cooking the eggs, and I didn't expect that to be a problem the first time I made this but oops, scrambled egg waffles are not the vibe. Whisk until everything is smooth and combined. The mixture will look creamy and a little thick, and that's exactly right.
- Step 4: Fold Batter Together:
- Pour the wet ingredients into the dry ingredients and fold gently and I mean gently. This is not the time to go wild with a whisk. Overmixing is one of the biggest mistakes you can make with protein powder waffles because it develops the gluten in the flour and makes them tough instead of tender. A few lumps are completely fine and actually good! I use a rubber spatula and do maybe ten to twelve slow folds, just until no dry flour streaks remain. Stop there.
- Step 5: Rest the Batter:
- Let the batter sit for five minutes before you cook. I know, I know you're hungry and this feels unnecessary. But this resting time lets the baking powder and baking soda activate, and it gives the flour a chance to hydrate fully. The batter will actually puff up slightly and thicken a little, which is exactly what you want. Skipping this step is what caused my smoke alarm incident, so please just set a five-minute timer and go make your coffee.
- Step 6: Cook the Waffles:
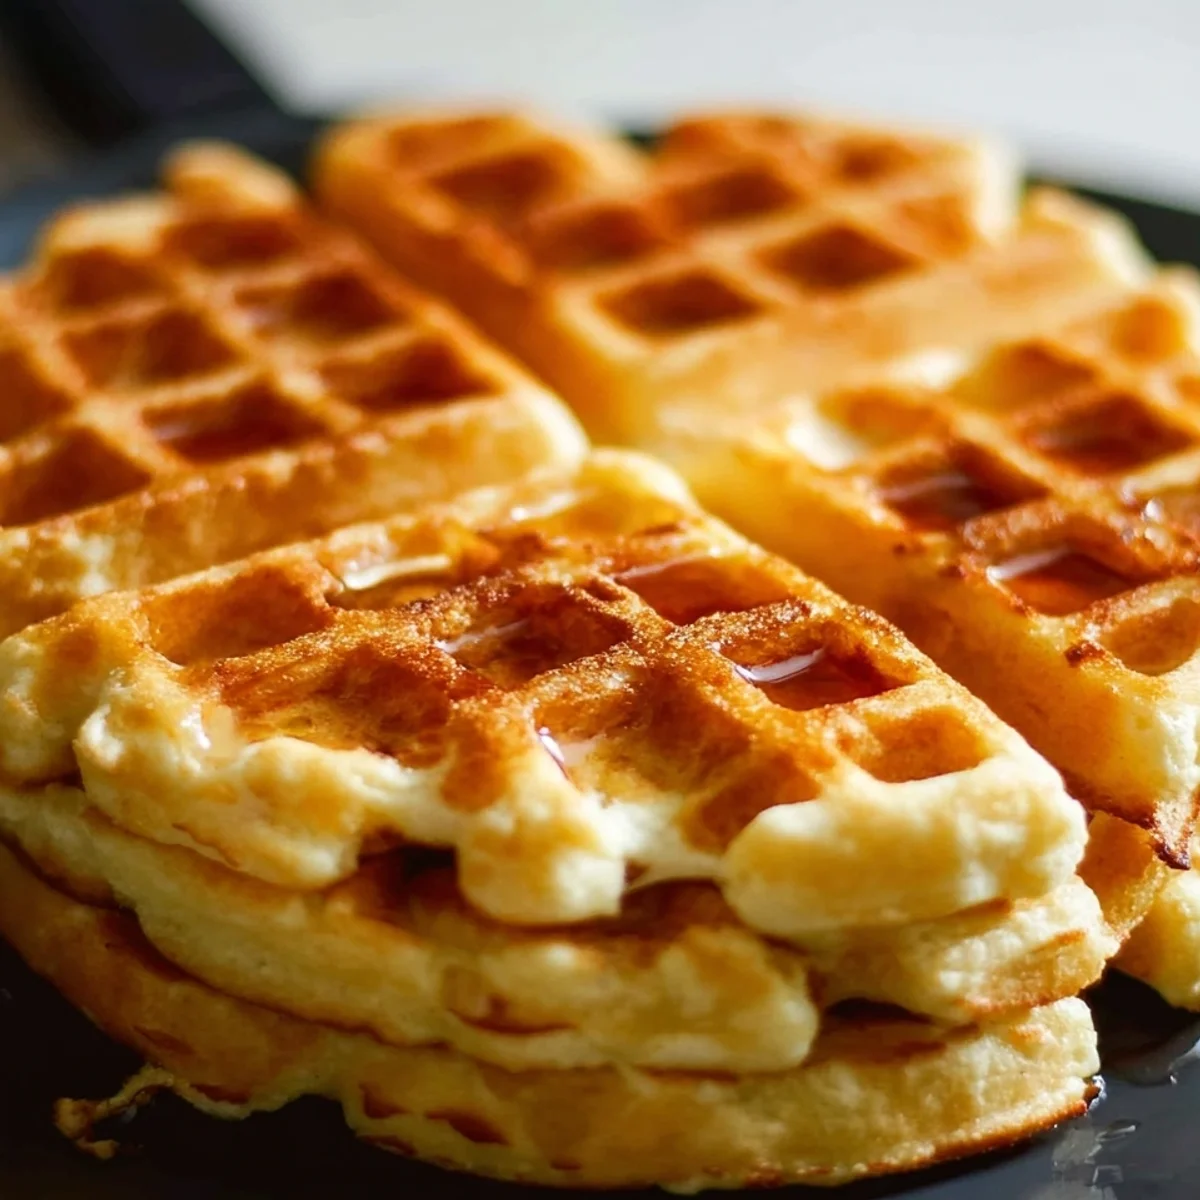
- Pour the batter into your preheated iron for most standard waffle irons, about 3/4 cup of batter works perfectly for one waffle. Close the lid and resist the urge to peek! Opening the iron too early tears the waffle apart. I cook mine for about four to five minutes until the steam slows down significantly that's your best cue that they're done. These protein powder waffles come out beautifully golden with crispy edges when you give them enough time. Patience here is genuinely rewarded.
- Step 7: Plate and Top:
- Transfer your waffles to a wire rack instead of a plate if you want to keep them crispy stacking them on a plate traps steam and softens those gorgeous edges. Now for the fun part: toppings! I love fresh berries, a drizzle of honey, and a dollop of extra Greek yogurt on top. A little sprinkle of granola adds crunch. To be real, sometimes I just eat them plain straight off the rack because I can't wait. No judgment here you earned this breakfast.
Making these on a slow Sunday morning is honestly one of my favorite rituals now. The kitchen smells like vanilla and something warm and toasty, the waffle iron hisses and steams, and there's this satisfying moment when you lift the lid and see perfect golden waffles staring back at you. It's simple, it's fast, and it makes me feel like I actually have my life together. Even on days when I absolutely do not.
Storage Tips for Keeping Your Protein Powder Waffles Fresh
These waffles store really well, which I was pleasantly surprised by! Let them cool completely on a wire rack before storing and I mean completely, not just 'mostly cool.' I made the mistake of packing them warm once and ended up with a soggy, steamy container of sadness. Store them in an airtight container in the fridge for up to four days. For longer storage, freeze them individually on a baking sheet first, then transfer to a zip-lock bag they'll keep for up to two months. Reheat in a toaster or toaster oven to bring back that crispy texture. The microwave technically works but makes them soft, and after all that effort to get crispy edges, why would you do that to yourself?

Easy Substitutions for Making Protein Powder Waffles Your Own
I've experimented a lot with swaps in this recipe, so let me save you some trial and error! If you don't have vanilla whey, a plant-based vanilla protein powder works just know the texture gets slightly denser. Whole wheat flour can be swapped for oat flour for a gluten-friendlier option, though the waffles will be a little more delicate. Greek yogurt can be replaced with sour cream or even cottage cheese blended smooth honestly the cottage cheese version surprised me with how good it was. Almond milk swaps easily with any milk you have on hand, including regular dairy milk. And if coconut oil isn't your thing, melted butter adds a richer, more classic waffle flavor that's really hard to argue with.
Serving Protein Powder Waffles Like a Weekend Brunch Pro
Okay, let's talk toppings because this is where things get really fun. My absolute favorite way to serve these is with a big handful of fresh mixed berries, a generous drizzle of raw honey, and a spoonful of Greek yogurt on top it's like a full protein-packed parfait situation happening right on your waffle. For something more indulgent-feeling, try sliced banana, a drizzle of almond butter, and a tiny sprinkle of dark chocolate chips. If you're meal prepping, serve alongside a couple of scrambled eggs for an even bigger protein hit. And honestly, a hot cup of black coffee or a matcha latte on the side makes this feel like a proper brunch moment, even if you're eating it alone in your kitchen at 7am in your pajamas. No shame.
The Backstory of Protein Powder Waffles and Why I'm Obsessed
Waffles have been an American breakfast staple since the 1600s, brought over by Dutch settlers and eventually perfected into the crispy grid-patterned beauties we know today. The modern fitness twist adding protein powder to classic recipes really took off in the early 2010s as home cooks started getting creative about hitting their nutrition goals without giving up the foods they loved. I got into protein powder waffles during a season of my life when I was trying to eat more intentionally without feeling like I was on a diet. I wanted breakfast to feel joyful and satisfying, not like a punishment. These waffles became my answer to that all the comfort of a classic weekend breakfast with the kind of nutrition that actually keeps you full until lunch.
I really hope these become a staple in your kitchen the way they've become one in mine. There's something so satisfying about a breakfast that tastes like a treat but actually fuels your whole morning. If you make these, please drop a comment below I want to hear your topping choices, your substitution experiments, your victories, and yes, even your smoke alarm moments. We're all in this together!

Frequently Asked Questions About Protein Powder Waffles
- → Can I make protein powder waffles without a waffle iron?
Honestly, you can use this same batter to make protein pancakes on a nonstick skillet! They won't have those crispy edges, but the flavor is just as great. Cook on medium-low heat and flip carefully the batter is a little more delicate than regular pancake batter.
- → Why are my protein waffles sticking to the iron?
Two likely culprits: not enough oil on the iron, or opening it too early. Make sure you grease the iron generously before each waffle and wait until the steam really slows down before lifting the lid. Patience is the secret weapon here I learned this the hard way!
- → Can I use a different flavor of protein powder?
For sure! Chocolate protein powder makes an amazing dessert-style waffle just add a few chocolate chips to the batter and you're in business. Unflavored works too, though you might want to add a tablespoon of maple syrup to compensate for the missing sweetness. Experiment and see what you love.
- → How do I keep the waffles crispy after cooking?
Place them on a wire rack in a 200°F oven instead of stacking on a plate stacking traps steam and kills the crispiness fast. The wire rack lets air circulate all around the waffle. This trick single-handedly changed my waffle game and I wish someone had told me sooner.
- → Is this recipe good for meal prep?
It's one of my favorite meal prep breakfasts! Make a double batch, cool completely, then freeze individually. Reheat in the toaster on busy mornings and they come out surprisingly crispy. Having a stash of these in the freezer genuinely makes weekday mornings so much less stressful.
Crispy Protein Powder Waffles with 41g Protein
Protein powder waffles packed with 41g protein per serving. Crispy outside, fluffy inside a high-protein breakfast ready in 20 minutes.
Ingredients
Protein-Packed Waffle Batter
- 1 cup vanilla whey protein powder (about 4 scoops)
- 1/2 cup whole wheat flour
- 1 tsp baking powder
- 1/4 tsp baking soda
- 1/4 tsp fine sea salt
Creamy Wet Binders
- 3/4 cup plain Greek yogurt (2% fat)
- 2 large eggs
- 1/2 cup unsweetened almond milk
- 2 tbsp melted coconut oil
- 1 tsp pure vanilla extract
Golden Crisp Enhancers
- 1 tbsp honey
- 1 tsp apple cider vinegar
- 1 tbsp cornstarch
Fresh Power Toppings
- 1/2 cup fresh blueberries
- 2 tbsp natural almond butter
- 1/4 cup plain Greek yogurt (for topping)
- 1 tbsp pure maple syrup
Instructions
-
1Preheat Your Waffle IronPreheat your waffle iron to medium-high heat (around 375°F if adjustable). Lightly grease the plates with a small amount of coconut oil or non-stick spray. A properly preheated iron is the secret to getting these Crispy Protein Powder Waffles with 41g Protein perfectly golden and crisp.
-
2Mix Dry IngredientsIn a large mixing bowl, whisk together 1 cup vanilla whey protein powder, 1/2 cup whole wheat flour, 1 tsp baking powder, 1/4 tsp baking soda, 1/4 tsp fine sea salt, and 1 tbsp cornstarch. The cornstarch is a key crisp enhancer, so don't skip it. Whisk until fully combined with no lumps.
-
3Combine Wet IngredientsIn a separate medium bowl, whisk together 3/4 cup plain Greek yogurt, 2 large eggs, 1/2 cup unsweetened almond milk, 2 tbsp melted coconut oil, 1 tsp pure vanilla extract, 1 tbsp honey, and 1 tsp apple cider vinegar. The vinegar reacts with the baking soda to create a lighter, crispier texture.
-
4Fold Batter TogetherPour the wet ingredients into the dry ingredients and gently fold together using a spatula until just combined. Do not overmix - a few small lumps are perfectly fine. Overmixing develops gluten and will make your Crispy Protein Powder Waffles with 41g Protein dense and chewy instead of light and crisp.
-
5Rest the BatterLet the batter rest for 3–4 minutes before cooking. This allows the baking powder and apple cider vinegar to activate fully and the protein powder to hydrate. For the best Crispy Protein Powder Waffles with 41g Protein, this short rest makes a noticeable difference in rise and texture.
-
6Cook the WafflesPour approximately half the batter onto the greased waffle iron, spreading it evenly to the edges. Close the lid and cook for 5–7 minutes without opening early - resist the urge to peek! Your Crispy Protein Powder Waffles with 41g Protein are ready when steam stops escaping and the exterior is deep golden brown.
-
7Plate and TopTransfer waffles to a wire rack for 1 minute to maintain crispiness - avoid stacking them directly. Top each serving with 1/4 cup fresh blueberries, 1 tbsp natural almond butter, 2 tbsp plain Greek yogurt, and a drizzle of 1 tbsp pure maple syrup split between both plates. Serve immediately and enjoy.
Notes
Storage Tip: Store leftover waffles in an airtight container in the refrigerator for up to 3 days, or freeze them individually on a baking sheet before transferring to a freezer bag for up to 2 months. Reheat in a toaster for best crispiness.
Substitution Tip: If you don't have vanilla whey protein powder, a plant-based vanilla protein powder works well — just add an extra 2 tbsp of almond milk since plant-based powders tend to absorb more liquid and can make the batter thicker.
Cooking Tip: Protein powder burns faster than regular flour due to its sugar content, so keep your waffle iron at medium rather than high heat if you notice the exterior browning too quickly before the inside is fully cooked through.
Serving Tip: For an extra protein boost, swap the maple syrup topping for an additional dollop of plain Greek yogurt mixed with a teaspoon of honey — it adds creaminess while keeping the macros clean and pushing the protein content even higher per serving.
Equipment
Please check ingredients for potential allergens and consult a health professional if in doubt.
Nutrition Facts
It is important to consider this information as approximate and not to use it as definitive health advice.
Comments
Leave a Comment